foreverbox
links
collection


© 2009
A. Thomas Tran
A. Thomas Tran
FOREWORD
One day I wanted to make a music box.
It seemed a pretty simple task with a crystal clear objective: make a music box that, upon opening its lid, would play a tune called "Forever." But there was no word from anywhere telling me that "Foreverbox" wouldn't be complete until over two years after I began. I was never told of the obstacles I would face. There were no clear directions, no resources I could refer to for guidance in building it.
The point of this introduction is that I wanted everyone who is willing to make a music box to be able to have the resource I wish I could have had. Going through the project alone wasn't easy, but it doesn't have to be harder than it needs to be, especially when someone's already done it. So here it is: How I Made My Custom Music Box Tune.
THE MOVEMENT
The first step for me was to write a realistic music box arrangement for the selected tune. I suppose when I say realistic, I mean that I had to keep in mind that the music box repeats, and each repeating loop lasted about 15-17 seconds (for the specific music box I used). Also, it is not possible to have two notes quickly played consecutively, unless there's more than one tooth on the comb emitting the same frequency. In fact it's even a bad idea to have the same note hitting anytime within about one second of the first hit. The first hit makes the note ring, the second hit will cut the ringing short. This is probably very clear if you take a look at the music box movement. (I refer to all the metal stuff attached to the wooden box as "the movement". It is the essential part that generates music). At first, I wasn't bright enough to realize the problem of playing consecutive notes, and my first results of making the music box weren't pleasant. =)
Furthermore, I ended up having to rewrite the arrangement in a simple form of melody and chords, because of restrictions of the limited notes on the combs, which leads into the following section…
THE COMB
Take a look at the movement. The comb is the piece of the movement that's got teeth on it, usually some multiple of 18 teeth. The 18-note combs usually have one or two fat screws that attach the comb to the rest of the metal movement. The trickiest thing about a comb is that each comb has a different set of notes. This means you need a very observant ear to make certain that the comb you choose will support the mandatory notes of your custom tune.
I had a lot of trouble finding a comb that matched the same notes I needed to complete Foreverbox. To illustrate, Forever has these mandatory notes: C, D, E, F, G, and A. The chords are: C, A, F, and G. (Of course, you can always transpose and maintain relative pitch.)
At first I bought a movement for "Memories" but after a more scrutinizing review, I found that the comb lacked the necessary "D" melody note I needed for Forever. I had to rearrange the piece so that the tune would have to match the specifications of the comb, although it should have been vice versa. Anyhow, years after I bought the comb for Memories, I realized that I could buy metal movements alone, *separate* from the wooded boxes, for a cheaper price.
Places like San Francisco Music Box and Richter's seem to sell movements for $10.00 - $15.00. These guys carry hundreds of movements for dozens of songs, so after I found out about this information, I had no excuse for an inappropriate comb. I ended up with the movement for "Anniversary Waltz" which was what I stuck with until the final product. The arrangement was rewritten so that the accompaniment matched the notes on the comb.
JAPANESE/SWISS MOVEMENTS
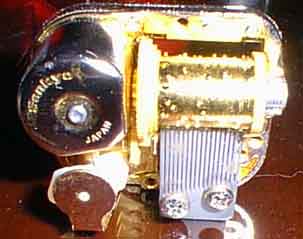
Another word about the movements, I found that there are two kinds of movements that dominate the low-end music box market: Japanese and Swiss. The Swiss ones I have seen are also called "Romance" movements, and the Japanese movements are made by a company called Sankyo. Richter's wanted more for the Swiss movements, perhaps the quality is somehow better, but I don't know much about the differences between the two. I used a Sankyo movement for Foreverbox. I believe that although the mounting points are the same on Romance and Sankyo movements, the other parts of the movement, like the comb or the cylinder spool, are not interchangeable between the two types of movements.
THE CYLINDER SPOOL
Onward to the next and most important part of the movement: the cylinder spool. Again, if you know what a movement looks like, it's probably easy to point out the spool. It's the cylinder with all the tiny protrusions. Powered by a windup spring, the spool rotates about its axis, while the protrusions lift and release specific teeth on the comb to emit sounds.
REMOVING THE SPOOL
I would like to mention that spools should be relatively easy to remove from the movement. Usually, you can somehow "unscrew" some metal piece that is opposite the side of the windup spring. I believe that on the Swiss movements, removing the spool is as simple as removing screws. However, on the Sankyo movements, it is not obvious. It doesn't require any drilling procedures or krazy glue restorations (I wish I knew that the first time around.) Look closely. There is a small, hollow metal cylinder that holds the spool in its place. It's opposite the side of the windup spring. After a long time, I realized that the cylinder had threads on the outside surface like a screw. Using a small pair of pliers, you can twist the cylinder little by little, and the spool will become more and more loose until finally the spool is free. Replacing the spool is simple once you figure out how to remove the spool.
MAKING A NEW SPOOL
This is where I spent most of the time physically and mentally working on the music box. I spent a good 100+ hour estimation physically working on this section. The main goal is to make a whole new spool for the movement to replace the old. THIS was the biggest obstacle to overcome.
I once asked my physics teacher in high school how I might go about this and he gave some suggestions, like "super glue can work wonders" but unfortunately none worked out. I scoured the phone book, called many places (metal shops, woodshops, clockmakers, clock repairers) but they all told me that they didn't handle such physically small perforations/protrusions like that. One company told me they could make the spool from specific engineering blueprints in a flat metal form with protrusions, but would not be able to bend it perfectly into a cylinder without ruining its shape. I went to music box stores that turned me down, some even said it would be impossible to do it. Reuge Music said they would make 100 cylinders for something like $2500 but that was entirely unrealistic. I'd given up the project after being discouraged, but new hope sparked within me every so often. One such spark lead me to do massive internet researching and e-mailing, which I hadn't thought about as a resource until then. Of the many responses, I was grateful that there were three resources responding with positive comments.
The first was Margeret Marcus from "The Music Box Shop". She suggested that I look around in libraries for books on this. The closest thing I found at the UCLA Music Library were books on _restoring_ music boxes. Reading these books helped me understand more about the movements and gave me ideas on how to create my own cylinder. (It also allowed me to realize how difficult a task I was taking on, and that it would be downright impossible to find a how-to-guide-build-a-cylinder text.)
Second was Danilo Konvalinka, from "Music Wonderhouse". Danilo was extremely helpful in giving me information about how music box spools were originally made back in the days before spools were factory produced. The most important information that Danilo gave me was this: the protrusions on the cylinders were made by inserting small pieces of cut music wire into drilled holes on a hollow metal cylinder. The cylinder was then filled with cement, so that the cut music wire "pins" would stay in their place. To come to a resolution, I combined this with a technique I was given by:
Larry Smith. Larry was the most hospitable of those who responded. I truly thank him and ask that you recognize his direct significance to the completion of the project. Larry seemed to deeply care about this project, and seemed to love writing detailed explanations on all the suggestions he could think of. In fact, it was he who proposed that I write up a how-to-build-a-music-box kind of thing. What you're reading is the product.
THE WONDERS OF POLYMER CLAY
Larry suggested that I make a cylinder completely out of polymer clay. Polymer clay is a kind of plastic that bakes to hardness in 15-30 minutes in home ovens at 275°. It can be found at any arts & crafts store (i.e. Michael's). A few brands of polymer clay are FIMO, Sculpey, and PROmat. I used PROmat. Two ounces of PROmat (~2 dollars per two oz.) was enough for me to practice and finish a few cylinders. I think it's awesome that the clay is so affordable. Anyhow, Larry commented that maybe I would be able to bake the protrusions from clay, but when I made an effort to do this, I discovered that the clay clearly did not have enough strength to bear the torque of the spring against the comb.
Improvising from the two given solutions gave me this: instead of baking a hollow cylinder, bake a solid cylinder spool and stick small wire pins in it! Alas, an ultimate solution after two gloomy years of failure. Still, problems still remained unresolved. Where would I find the music wire pins to stick into the cylinder? How would I be able to bake a perfect cylinder the exact size of the movement? How would the clay cylinder mount onto the movement as a spool?
AT LAST, A TECHNIQUE TO MAKE A SPOOL
Let me tell you now, this part gets extremely tricky. Although I can tell you exactly what worked for me, it's not guaranteed it will work for you. You may not be able to find the corresponding parts so you'll need to use your creativity. I believe you can easily find the music wire at most hardware stores. I found my wire at Orchard Supply Hardware (OSH). OSH sells these things in packages that are probably enough for you to make a couple hundred spools. The thing is, for each protrusion, you only need about a quarter of an inch of wire, and the wire I found came only in packages of ~200 ft. for five bucks.
Btw, I used to mail out my leftover music wire for free, but I've finally run out (what do you expect, it's been 6 years heheh). I'm sure if you do a little bit of searching on the internet (or at your local hardware store), it will be easy to find. =)
I've found that for the newer Japanese Sankyo combs, you want music wire that is .020" in diameter. Wires that are too fat in diameter will have problems because they may accidentally affect an undesired tooth. This small size also seems to help because of the increased accuracy when poking the wire pins into the clay cylinder. It seems it's much harder to be accurate when poking large pieces of wire into the baked clay cylinder.
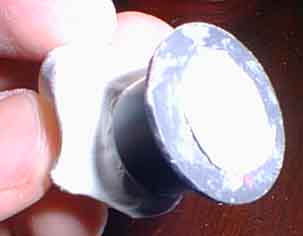
At OSH, I also found what I needed to be able to bake the clay into perfect solid cylinders. I was *extremely* fortunate to find this. It is a piece of dark-gray plastic that looks like a hollow cylinder piece, except one of the ends has got additional plastic that makes the thing look sorta like a teeny gray top-hat. Except it looks like a top hat with the top cut out, so that you can stick your pinky through one end and see your fingernail pop out on the other. It's called a "Reducer Bush". I'm not exactly sure what real function of the reducer bush is, but I know it has to do with small wheels and axles (maybe for furniture). Anyway, here are more details about the product:
-
5/8 OD, 1/2 ID
Reducer Bush
$2.79 Each
Brand: California Caster
Color: dark grey
5/8" O.D. x 1/2" I.D.
part no. 1/2 - 5/8 reducer
adapts 5/8 bore wheels to 1/2 axle
bar code: 7 80194 00027 6
OSH code: 0 37049 91338 1
OSH product # (?): 257-7344
1) Make the left half of the cylinder
2) Make the right half of the cylinder
It doesn't really matter which is left or right; what does matter is that you make the two pieces separately. After you bake each piece, you need to krazy glue the two pieces together.
The question now: how do I shape the two molds of cylinder so that they'll fit perfectly into the movement? Referring to a Sankyo movement, take a look at the cylinder spool you removed. There are two plastic chassis that hold on to the metal spool. Remove the two pieces. Very clearly, they are not identical. You need to use each of those pieces to hold the baked clay in its place, in a way that allows the clay to spin about the axis of the original metal piece.
Stuff the top-hats with clay. Pack it in tightly! Now press one piece of the plastic chassis against one of the two holes of the top-hat. Make sure the plastic chassis is centered PERFECTLY. This is important, and the reason will be clear later. Now push the clay into the plastic chassis, from the other side of the top-hat. Remove the plastic chassis and you'll have a negative impression of the plastic chassis. The side that does not have the negative impression can be cut off with a sharp blade or razor. Now is the time to bake it! Remember to remove the plastic chassis. I'm not sure whether it will melt, but I'm not sure you'd want to risk it either. You can bake the clay along with the top-hat, the top-hat doesn't seem to melt. After the baking, remove the clay from the top-hat. By this time, you probably see what's going on now. The negative impression will fit perfectly into the plastic chassis.
Do the same with the other plastic chassis. After baking it and removing the clay from the top-hat, try sticking the two baked pieces of cylinder together (don't use glue yet). Attach the plastic chassis to each cylinder. You'll notice that the clay cylinder you've made is too long to be able to fit into the movement. Use a razor to cut off some clay from one of the cylinders, until the two things will fit.
If you're sure it fits, you can krazy glue the two pieces of clay together. This is your new clay cylinder. It should mount perfectly into the movement, and it should rotate perfectly. Be sure that the cylinder doesn't interfere with any of the teeth on the comb. If the cylinder does interfere, your best bet is probably to learn from your experience and try baking another.
WHAT ABOUT THE PINS?
Now that you've chosen your comb, write a musical arrangement of the song. Make sure that every note you choose is a note that can be emitted by one of the comb's teeth. Be sure that no two teeth are consecutively hit within a single beat.
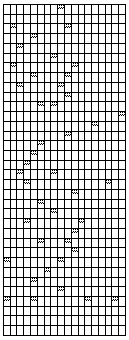
You've got an arrangement. Now the project gets insane (not unlike before =). Where will you pin on the cylinder? Cut out a piece of paper that you'll be able to roll perfectly around the clay cylinder. Remove the piece of paper, and on the paper, make a tiny graph that portrays time vs. teeth, like so:
When the paper is rolled around the cylinder, it should indicate exactly where you need to pin. The graph needs to be perfect. There is little margin for error. Any mark that is just a bit off will cause the tooth to be released too early or too late. Also, the pin might end up interfering with wrong teeth.
Since the graph demands such perfection, I used Microsoft Word to make a graph, and printed it out. You can use my Word document as a template. This is a copy of the original document I used to make "Foreverbox":
Use Word to make your graph, print it out, and cut it to size. Use tape conservatively to hold the graph in its place perfectly around the cylinder.
NOW THE PINNING PROCESS
Wooowhee! We're almost there!
Cut out a quarter-inch piece of music wire. File it down for about a half a minute against a metal file. Then pin the wire into the clay, in accordance with the graph you've taped around the cylinder. You need to be sure the music wire is filed well so that it does not cut into the teeth! If the music wire is still sharp, it will detune the tooth, and eventually the tooth will break off. I experienced this misfortune and had to replace the comb. Another situation that will cause the teeth to break is if you don't push the pins in far enough. A pin that lifts a tooth too high will cause the tooth to experience a torque so great that the tooth will eventually snap. When this happened to me, I had already completed the first version of Foreverbox. Before giving Foreverbox as a gift, I tested it for hours. On the third day of testing, two teeth snapped, and one of the notes were detuned a whole half-step down. I was quite disheartened. This is my warning to you.
This section may seem simple, but I want to mention that this alone is the most time-consuming portion of the project. BE PATIENT! You're so close. It took me years of devotion to get this far, and if you're going to let go of it, somehow it doesn't seem fair.
Listen to the movement after you insert each pin! You need to check that the tempo is consistent, the correct tooth was hit, and the note is not lifted too high. I know this takes forever, but that is the only way you will know. It's very easy to incorrectly pin, and end with poor results.
Here are a few suggestions for this section: if you want to get an idea of how high the teeth can be lifted before breaking, look at another Sankyo/Romance movement that hasn't been tampered with. Look back at the movement you've made and check that the lifting height is similar. Also, if you can help it, don't ever unscrew the comb. I believe that leaving it in its original position will make it easier to compare lifting heights, which may prevent breakage.
When I was done with Foreverbox, I removed the paper graph and I coated each pin with krazy glue, to make sure the pins would not move around after years of play. After krazy glue, I tested the music box for several days to be sure Forever would really be.
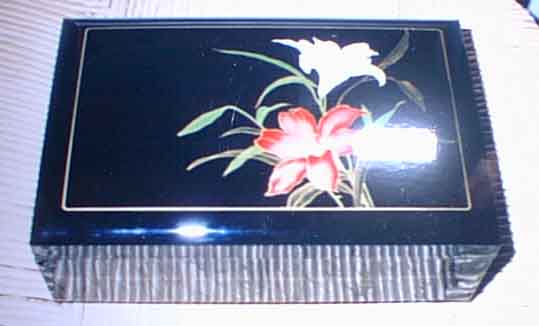
Find a music box, one without a movement. Again, you can buy the boxes at Richter's and San Francisco Music Box Factory. I believe most boxes have screw-in points so that you can mount your own movement into the box. Once you screw it in, you'll be done.
Wind up your box, and be ready for the most beautiful thing you've ever heard.
Thanks for reading.
© 1998. A. Thomas Tran.